Solar Activity Monitor
Getting Started
1) Switch on your device
2) Register
3) Set it up
Switch on your device:
Power up the Solar Activity Monitor by using the USB-C cable provided and a suitable 5V power source like a phone charger.
Your Solar Activity Monitor will go into “Wifi Config Mode" and will create a Wifi hotspot with the name of "Solar Activity Monitor". Now go to your device's settings i.e. laptop, mobile phone etc… and connect to it entering the password which can be seen on the Solar Activity Monitor’s screen.
You will be presented with a Captive Portal, go ahead and press “Configure Wifi” button.
The device will scan the local area and present you with a list of Wifi Access Points, select the one you wish to connect to by taping or clicking onto it and type in the password in the password field and then press the “Save” button.
Should a captive portal not appear, you can use your browser by typing in http://192.168.4.1 in the url window. This will manually take you to the captive portal and you should now be able to enter your credentials.
The http://192.168.4.1 local address is only for the Captive Portal to setup WiFi and not for registering or setting up your SAM.
You will see “Wifi Parameters Saved” on the Solar Activity Monitor and then the display will show “Connected!".
The Solar Activity Monitor remembers one WiFi Network and will want to connect to it automatically when in range. If it does not detect the stored WiFi network it will enable the Captive Portal and ask you to choose a network.
If you wish to change to a different WiFi router/network in the same location as the one you have just connected to then you will have to switch off that router, switch off your Solar Activity Monitor, switch back on your Solar Activity Monitor and connect to the desired WiFi router/network. You can now switch back on the switched off router.
Another alternative way is to walk away out of range of your router with your Solar Activity Monitor connected to a power pack, switch off and on your Solar Activity Monitor and tether it to your phone. You can now walk back into where your original router is, switch off tethering to your phone and switch off and on your Solar Activity Monitor, and it will now scan all WiFi networks and you can choose the one you want to connect to from the Solar Activity Monitor’s Captive Portal.
Registering:
Once the The Solar Activity Monitor is connected to Wifi, “Device not registered” will appear with your serial number and here you will be required to enter the serial number and your callsign into the form under the Register tab.
The Register tab is found on the website only. The Solar Activity Monitor does not provide a Web Portal on your local network for setting up.
Once your Solar Activity Monitor is registered a confirmation in red will apear above the instructions. Now switch it off, wait at least 30 seconds (it takes time for the capacitors to discharge) and switch it back on again, it will now connect to your Wifi and start displaying information.
If you see a blank white screen whilst switching back on again then power off and wait at least 1 minute before switching back on again.
Should the Solar Activity Monitor change hands the next person can simply enter the serial number in and their callsign and start using the device.
Setting up:
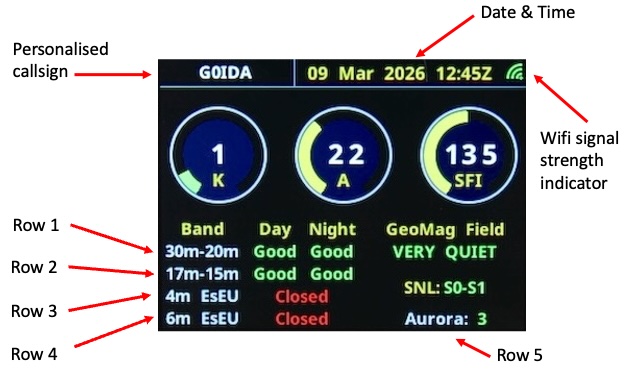
Once registered you can configure the bands you wish to disply via the drop down menu which are rows 1 - 4 on the form.
The Solar Activity Monitor updates every 15min.
Bands you can choose from, rows 1-4:
80m-40m
30m-20m
17m-15m
12m-10m
2m Eu
4m Eu
6m Eu
2m USA
VHF Aurora
The bottom right row of the Solar Activity Monitor is defined as row five and here you cn configure various options from the drop down menu.
Options you can choose, row 5:
Aurora
Sunpots
Solar Wind
Xray
Magnet Field
Aurora Degrees Latitude